Toyota Corolla: Light bulbs / Replacing light bulbs
■ Front turn signal/parking lights (vehicles without side turn signal lights)
1 Turn the bulb base counterclockwise.
Type A

Type B

2 Remove the light bulb.
Type A

Type B

3 When installing, reverse the steps listed.
■ Front side marker lights
1 Turn the bulb base counterclockwise.

2 Remove the light bulb.

3 When installing, reverse the steps listed.
■ Rear turn signal lights and rear side marker lights (vehicles with blub type rear side marker lights)
1 Open the trunk lid.
2 Insert a flathead screwdriver between the cover and the light assembly and pry up the cover to disengage the claws (indicated by a dotted line).
To prevent scratching the vehicle, wrap the tip of the flathead screwdriver with a cloth, etc.

3 Pull the cover toward the rear of the vehicle and remove the cover.

4 Remove the 2 screws and then remove the light assembly by pulling it straight back.

5 Turn the bulb base counterclockwise.

A - Rear side marker lights
B - Rear turn signal lights
6 Remove the light bulb.

A - Rear side marker lights
B - Rear turn signal lights
7 When installing the light bulb, install it by conducting steps 6 and 5 with the directions reversed.
8 Install the light assembly and then install the 2 screws.
Align the guide A and pin B on the light assembly with the mounting when installing it.

9 Install the cover.
■ Rear turn signal lights (vehicles with LED type rear side marker lights)
1 Open the trunk lid.
2 Insert a flathead screwdriver between the cover and the light assembly and pry up the cover to disengage the claws (indicated by a dotted line).
To prevent scratching the vehicle, wrap the tip of the flathead screwdriver with a cloth, etc.

3 Pull the cover toward the rear of the vehicle and remove the cover.

4 Remove the 2 screws and then remove the light assembly by pulling it straight back.

5 Turn the bulb base counterclockwise.

6 Remove the light bulb.

7 When installing the light bulb, install it by conducting steps 6 and 5 with the directions reversed.
8 Install the light assembly and then install the 2 screws.
Align the guide A and pin B on the light assembly with the mounting when installing it.

9 Install the cover.
■ Back-up lights
1 Open the trunk lid, remove the clips, and pull back the cover.

2 Turn the bulb base counterclockwise and remove it.

3 Remove the light bulb.

4 When installing, reverse the steps listed.
WARNING
■ Replacing light bulbs
- Turn off the lights. Do not attempt to replace the bulb immediately after turning off the lights. The bulbs become very hot and may cause burns.
- Do not touch the glass portion of the light bulb with bare hands. When it is unavoidable to hold the glass portion, use and hold with a clean dry cloth to avoid getting moisture and oils on the bulb. Also, if the bulb is scratched or dropped, it may blow out or crack.
- Fully install light bulbs and any parts used to secure them. Failure to do so may result in heat damage, fire, or water entering the light unit. This may damage the lights or cause condensation to build up on the lens.
■ To prevent damage or fire
Make sure bulbs are fully seated and locked.
Other information:
Toyota Corolla 2019-2025 Owners Manual: Odometer and trip meter display
■ Changing the display Press the display change button until the desired item is displayed. ■ Display items l Odometer Displays the total distance the vehicle has been driven. l Trip meter A/Trip meter B Displays the distance the vehicle has been driven since the meter was last reset. Trip meters A and B can be used to record and display different distances independently. To reset, display t..
Toyota Corolla 2019-2025 Owners Manual: Audio screen adjustment. Voice command system
Audio screen adjustment ■ Screen format settings The screen format can be selected for USB video. 1 Press the “MENU” button. 2 Select “Setup”. 3 Select “Audio”. 4 Select “Common”. 5 Select “Screen Format”. 6 Select the desired item to be adjusted. A Select to display a 4 : 3 screen, with either side in black. B Select to enlarge the image horizontally and vertically to full ..
Categories
- Manuals Home
- 12th Generation Corolla Owners Manual
- Interior features
- Driving
- Instrument cluster
- New on site
- Most important about car
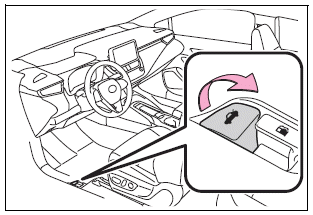
Opening the trunk
■ Trunk opener
Pull the lever upward to release the trunk lid.

■ Trunk release button (vehicles with a smart key system)
While carrying the electronic key, press the button on the trunk lid.
When all the doors are unlocked using one of the following methods, the trunk can be opened without the electronic key:
Entry function Wireless remote control Door lock switches Automatic door unlocking system Mechanical key

