Toyota Corolla: Do-it-yourself maintenance / Hood
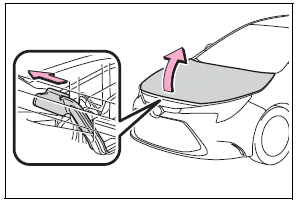
Opening the hood
1 Pull the hood lock release lever.
The hood will pop up slightly.
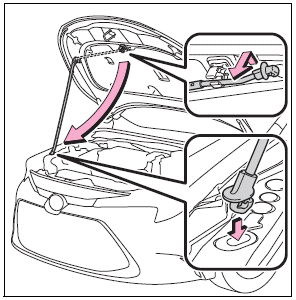
2 Pull the auxiliary catch lever to the left and lift the hood.
3 Hold the hood open by inserting the support rod into the slot.
WARNING
■ Pre-driving check
Check that the hood is fully closed and locked.
If the hood is not locked properly, it may open while the vehicle is in motion and cause an accident, which may result in death or serious injury.
■ After installing the support rod into the slot
Make sure the rod supports the hood securely preventing it from falling down onto your head or body.
NOTICE
■ When closing the hood
Be sure to return the support rod to its clip before closing the hood. Closing the hood with the support rod not clipped could cause the hood to bend.
 Do-it-yourself service precautions
If you perform maintenance by yourself, be sure to follow the correct procedure
as given in these sections.
Maintenance
WARNING
The engine compartment contains many mechanisms and fluids that may move suddenly,
become hot, or become electrically energized...
 Positioning a floor jack
When using a floor jack, follow the instructions in the manual provided with
the jack and perform the operation safely. When raising your vehicle with a floor
jack, position the jack correctly...
Other information:
Toyota Corolla 2019-2025 Owners Manual: Indications on multi-information display
A - LTA indicator The illumination condition of the indicator informs the driver of the system operation status. Illuminated in white: LTA system is operating. Illuminated in green: Steering wheel assistance of the steering assist function or lane centering function is operating...
Toyota Corolla 2019-2025 Owners Manual: Head restraints
Head restraints are provided for all seats. WARNING ■Head restraint precautions Observe the following precautions regarding the head restraints. Failure to do so may result in death or serious injury. Use the head restraints designed for each respective seat...
Categories
- Manuals Home
- 12th Generation Corolla Owners Manual
- Lubrication system (2.0 L 4-cylinder [M20A-FKS] engine)
- Engine immobilizer system
- Lubrication system (1.8 L 4-cylinder [2ZR-FAE] engine)
- New on site
- Most important about car
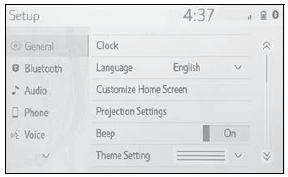
General settings
Settings are available for clock, operation sounds, etc.
Displaying the general settings screen
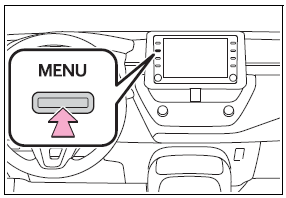
1 Press the “MENU” button.
2 Select “Setup”.
If the general settings screen is not displayed, select “General”.
3 Select the desired items to be set.